

.

.


Main photo gallerys are below Information.
SOUTHPORT
Dover, Hastings, Ida Bay, Pigsty Ponds, Pindars Peak & Adamsons Peak
SMALL PHOTO & INFORMATION PAGE
SOUTHPORT and DOVER are picturesque, coastal settlements in the extreme south east corner of Tasmania. This coast is famous for its bays, beaches and forests. In addition to the west of Southport are some very picturesque mountains. It is the place where Hobart people go to take a short holiday. The great attractions here include:
-
HASTINGS is the site of some famous limestone caves. It is west of Dover.
-
IDA BAY is the site of a tourist railway. It is south west of Dover.
-
DOVER has picturesque views of the Huon Estuary. It is 30 minutes from HUONVILLE and 60 minutes from HOBART.
-
SOUTHPORT has picturesque views of the Huon Estuary. It is 30 minutes from GEEVESTON and COCKLE CREEK.
-
COCKLE CREEK is an enchanting place. It is also the start of the SOUTH WEST National Park. It is the last place you can drive to in Tasmania.
-
KETTERING is the gateway to the lovely beaches and forests of BRUNY ISLAND.
-
PIGSTY PONDS is a beautiful valley of lakes and tarns with a silly name. Reaching it requires a multi day trek. Access is from the Moonlight Ridge Track, which begins west of Dover.
-
PINDARS PEAK is a high spire west of the Pigsty Ponds. The views from it are simply awesome. Visitors usually stay over night at the Pigsty Ponds before proceeding. This track goes all the way to the West Coast.
-
ADAMSONS PEAK is a high mountain west of Ida Bay. It can be reached in 7 hours. There are awesome views from its peak. The more intrepid visitors go on multi day trips and visit the Cow and Calk as well as the Mesa peaks.
Nearby places are described in the REGION HUON VALLEY page.
View Region Huon Valley in a larger map
FACILITIES: There are shops and petrol pumps at Southport and Dover. There is some accommodation in the lower HUON VALLEY.
TOURIST information on HASTINGS CAVE the telephone is (03) 6298 3209 contact www.parks.tas.gov.au/reserves/hastings
For information on the IDA BAY RAILWAY the telephone number is (03) 6298 3110 or contact www.idabayrailway.com.au
SIGHTS: Dover is a small coastal town and the last place in the south west that you can buy petrol and supplies. Southport is just a settlement. This area is famous for its beautiful bays, beaches and forests. Both are holiday places for people from HOBART.
Southport has two additional attractions. To the east is the HASTINGS CAVE and Thermal Pool. This has been a major attraction since the 1930s. To the west is the IDA BAY RAILWAY. This is a small, restored, former, industrial railway that now takes tourist on a short trip to the coast.
ROUTE: The fastest route to both Dover and to Southport is the A6 Huon Highway that exits from the eastern side of HOBART.
Just south of GEEVESTON you can take the much longer, but beautiful, scenic, coastal route to Dover C638.
Hastings Cave is just west of Southport. The short road to Hastings Cave is gravel, but it is well maintained, so don't be deterred by it.
To LARGER SOUTHPORT PHOTOS
- DOVER
- Southport
- Hastings
- Pigsty
- Pindars
- Adamsons
- Ida Bay

1/ Is a small town in south eastern Tasmania. It is south west of Hobart and is the last town with any commercial facilities. This image looks across the peaceful waters of Esperance Bay towards the town of Dover.

2/ The scenic road to Dover is C638, which you access south of Geeveston. This road follows the Huon River and visits four small holiday settlements. This image looks south down the Huon River near Brooks Bay.

3/ This lovely beach is Hideaway Bay. It is a small holiday settlement just east of the C638 Road. This image looks to the north east across the wide Huon River towards Port Cygnet.

4/ This was our first view across Esperance Bay to Dover. Dover is both a beach holiday settlement and a small fishing point.

5/ This is a small beach on the northern edge of the Dover. This area exudes a lovely ambiance of serenity. There were many fine houses around these beaches.

6/ This jetty services the fishing boats of Dover. In the distant left is a fish processing factory.

7/ This is the fishing processing facility on the northern edge of Dover. The view looks east across the lower Huon River.

8/ This is the lovely, historic Dover Community Church. It dates back to 1877.

9/ This is the memorial to the fallen of the Great War. It honours twenty men from this area who died in this war. These 20 would have been a significant percentage of the tiny local population resident there at that time.

10/ This is the church hall. It is behind the church shown above.

11/ This is the historic primary school of Dover. It dates from about the 1890s. It is now used as a community, computer access centre.

12/ This one of the many historic houses of Dover. It is now used by a diving company.

13/ This is the other old church of Dover.

14/ This is the cafe of Dover. Dover is the last settlement with any commercial facilities in the lower Huon area.

1/ Southport is a beach settlement in the far south east of Tasmania. It is south west of Hobart and south of Dover. This image looks across the wide lower Huon River towards Southport.

2/ This image shows one of the beaches of Southport. It looks towards the Southport jetty.

3/ This is the Southport jetty. A number of fishing boats are based at Southport. There is good beach and river fishing in the lower Huon River area.

4/ This image looks east down the Southport jetty towards the D'Entrecasteaux Channel.

5/ This is the Southport Hotel and caravan park. This hotel is the last place where you can secure accommodation and have a good meal.

6/ The Southport settlement has many holiday homes. This area has a deep feeling of peaceful ambiance about it, so it is a popular destination for holiday makers from Hobart.

7/ This is another one of the lovely holiday homes at Southport. The age of this house shows that holiday makers having been coming down to Southport for a long time.

1/ Hastings is in the extreme south east corner of Tasmania. The famous Hastings Caves are just west of Hastings. The photo shows the old cave house, which is no longer the entrance. The old style of the building attests to how long the caves have been an attraction.

2/ A raised pathway takes you to the entrance to the Hastings Caves.

3/ I was told by a guide that the forest near Hastings Caves had not been logged, since the 1920s. It was interesting to note that even though the forest looked healthy, there was an obvious lack of large trees in it.

4/ The sights of Hastings Caves included this myriad of stalactites, tastefully lit, hung from the ceiling to give this magical, wonderland effect.

5/ A beautiful, white shawl hung from the ceiling of one of the Hastings Caves.

6/ The walkway through Hastings Caves included a lot of stairways.

7/ Every one of the Hastings Caves was unique in its variety of formations.

8/ The blackness down this small unaccessible cave was a good insight into what the cave system was really like.

9/ In this section of the Hastings Caves, you can see stalagmites growing up from the floor. When they join up with a stalactite growing down from the ceiling, they are called a column. You can see one on the far left. Others are close to joining up.

10/ The giant shawl in this photo were really enchanting. Hastings Caves is truly a magical place.

1/ The Pigsty Ponds is a valley of beautiful lakes and tarns in south eastern Tasmania with a stupid name. The photos in this gallery were taken on a multi day trip in 2014. We stayed over night near Ida Bay and we then trekked south west on the Moonlight Ridge Track. This image was taken south west of the Pigsty Ponds. It looks north towards Lake Mountain on the left, a distant Mount Wylly in the centre and the Maxwell Ridge on the right.

2/ We began by trekking south west on the Moonlight Ridge Track. To the south west we could see the distant, but massive peaks of the Cockscomb Ridge and Mount La Perouse.

3/ This is the Moonlight Ridge. We would be ascending this ridge and then following the spur line to the south west to reach the Pigsty Ponds.

4/ We now ascended the Moonlight Ridge. This is the view down from the Moonlight Ridge. It was snow covered at this higher level.

5/ We now trekked south west on the Moonlight Ridge Track. As you can see the from this image, the spur line is devoid of thick vegetation, which makes it easy to trek. To the north west of us we could see Wylly Mountain. It is the pyramid to the left and it is 1010 metres high. The Moonlight Ridge Track continues all the way to it.

6/ This image shows the view to the north west, as we trekked along the Moonlight Ridge.

7/ The weather was overcast that day, but for a brief moment the sun burst through the clouds to give this lovely view across the hills to the east towards Ida Bay.

8/ We now reached an area of the Moonlight Ridge called Agnetes Garden. Here there is a great view south towards the Cockscomb to the left and Mount La Perouse to the right. These mountains were covered in mist at the time.

9/ At last we reach a point on the Moonlight Ridge, where we could look down into the Pigsty Ponds. It is a typical glacial valley filled with lakes and tarns. This view looks north into this valley. To the right are the Reservoir Lakes and to the left are the Pigsty Ponds.

10/ This view looks towards the western edge of the valley of the Pigsty Ponds. It was taken as we were descending down into this valley. For those who love the wilderness the Pigsty Ponds is an enchanting place. I did, though, wonder why it has this silly name.

11/ We now camped over night in this sheltered valley. This was our first night in the wilderness, but we had come prepared with sleeping bags and food. If you come with the right people, the right equipment and the right weather, then you can have a safe and enjoyable experience in the Tasmanian wilderness.

12/ I took this photo as the sun was setting. It is looking west from the valley towards the distant Maxwell Ridge. This view would be very different in the morning.

13/ This image is a close up of the same Maxwell Ridge. It was taken soon after the photo above. The rugged parapet and the soft colours of the Pigsty Ponds make this a very mysterious place.

14/ During the night there was a light fall of snow. It transformed the Pigsty Ponds into something quite enchanting. This view is looking south east towards the Cockscomb Range. We intended to visit this area and then return to our camp for another night.

15/ This image shows how the snow made the landscape of the Pigsty Ponds very mysterious.

16/ We now visited Amdell Falls on the D'Entrecasteux River, which are south east of the Pigsty Ponds. They were an impressive sight. The drop is about 10 metres.

17/ We then returned to the Pigsty Ponds and explored the area around the Reservoir Lakes.

18/ We now camped for a second night at the Pigsty Ponds. More snow fell during this second night. This was my morning view of the rugged Maxwell Ridge. Compare this image to those of it above.

19/ We now trekked back to the Moonlight Ridge to go home. This was the view looking back towards the Pigsty Ponds and the Reservoir Lakes.

20/ This image shows pandanis with a thick layer of snow on them. All vegetation in alpine regions has to be able to survive snow and freezing winds. You too must be able to survive this, if you wish to visit the wilderness of Tasmania.

21/ This image was made on our return journey on the Moonlight Ridge. It is looking south west towards Lake Mountain on the right and the Maxwell Ridge on the left. In the distance is Wylly Mountain. It shows the enchanting atmosphere of the Tasmanian wilderness. We now returned to our bus at the track entrance.

1/ Pindars Peak is a rugged mountain spire in south eastern Tasmania. This gallery shows a trip made to it in the summer of 2015. This was a multi day trip into the wilderness of extreme south east of Tasmania. Our group first trekked to the Pigsty Ponds and the next day they continued to the south west. This image shows our final objective of "Pindars Peak".

2/ To reach Pindars Peak we first had to trek to the Pigsty Ponds, where we camped over night. This area is shown in the previous Pigsty Ponds Gallery, so it is not covered in this gallery. This image shows the view, as we exited the Pigsty Ponds.

3/ We now ascended the King Billy Saddle and trekked to the south west. This image is looking back towards the Pigsty Ponds and shows our last view of this lovely valley.

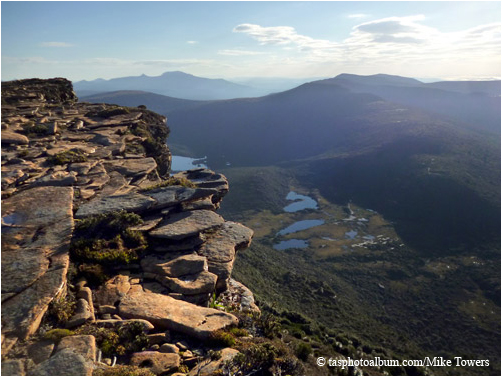
4/ This image was taken on the King Billy Saddle and is looking towards a distant Pindars Peak. The track continues along a spur line on the mountain to the right. Pindars Peak is an impressive 1230 metres high and the views from it are simply awesome.

5/ Our next objective was the summit of Lake Mountain. This peak is an impressive 1023 metres high. This image shows us celebrating our reaching the cairn. In the distance is Pindars Peak.

6/ North east of Lake Mountain is Lake Ooze. This image is looking down into Lake Ooze. Lake Mountain is casting the shadow on the left. From Lake Mountain we could see all the way to Ida Bay.

7/ We were now engulfed by a cloud. It is a very ethereal feeling to be engulfed in a "white out" and it is one of the things that you need to learn how to cope with, if you wish to visit the Tasmanian wilderness. It is easy to get lost in a white out. This image shows the approaching cloud.

8/ This image shows the spur line to a distant Pindars Peak. The track runs along this spur. Clouds were frequently sweeping over us, as we trekked onwards.

9/ This image shows the steep slopes of the mountain side that we were passing through.

10/ Here you can see the heavy packs that we were carrying and the kind of landscape we were advancing through. Some sections were quite rough.

11/ Frequently our views down from the spur line were totally obscured by cloud.

12/ The track was sometimes very close to the cliff line.

13/ This hardy tree is a King Billy pine. We occasionally found them on some slopes. You can see how the strong winds have destroyed it on one side.

14/ We came to this tarn on the spur line. It shows the many colours and textures of the wilderness. The weather was now deteriorating, so we made a decision to return to the Pigsty Ponds.

15/ There are numerous unnamed tarns in the wilderness. This image shows the mysterious atmosphere that they evoke.

16/ This was as close as we came to Pindars Peak. This sunshine was only a break in the bad weather and ominous clouds were closing in on us. You can see the kinds of vegetation that survive on the spur line. In the distance on the right is another tarn.

17/ This image shows you the typical steep angle of the cliffs in this area. We were trekking along the relatively flat top of the spur line that you can see on the right.

18/ We camped over night in a sheltered area of the King Billy Saddle. This image looks north towards Mount Wylly. It was taken as the sun was setting.
19/ In the morning we continued our journey back towards the Pigsty Ponds. This image shows a morning view of the distant Pigsty Ponds. Our return route the Moonlight Ridge Track follows the spur line on the right.

20/ We continued our trek north east along the spur line of the King Billy Saddle. This image is looking back towards the west. The very distant rugged mountain in the centre is Federation Peak. This is the highest mountain in Tasmania. There is a good view of it from Pindars Peak.

21/ The easiest sections of the track are like the section that you see in this image. Note the 15 kilogram packs that we were carrying.

22/ By the late afternoon we were back in the Pigsty Ponds, where we would camp the night. This image is looking towards the Maxwell Ridge.

23/ The next morning we left the Pigsty Ponds and ascended the Moonlight Ridge to follow this track back to Ida Bay. This image looks back to Lake Mountain and the Maxwell Ridge.

24/ This image looks north from the Moonlight Ridge towards Lake Mountain on the left, a distant Mt Wylly in the centre and the Maxwell Ridge on the right. You can see a snow covered version of this same view in the Pigsty Ponds Gallery.

25/ This was our last view of Pindars Peak, as we trekked to the north east.

26/ This image looks from the Moonlight Ridge to the north west towards Mount Wylly and beyond.

27/ This image shows the vegetation cover on the Moonlight Ridge and the rugged mountains and deep valleys that we passed by.

28/ This image looks south into the valley of the Lune River. In the foreground is the Moonlight Ridge that we were trekking along.

29/ This image shows the terrain towards the end of the Moonlight Ridge. The foreground to the right has been lit up by a break in the clouds.

30/ This image shows the view towards Ida Bay, as we ascended down from the Moonlight Ridge.

1/ Adamsons Peak is in the extreme south east of Tasmania west of Dover. This gallery shows photos taken on a trip to Adamsons Peak in 2014. This trip went beyond Adamsons Peak to other peaks, namely the Cow and Calf and then on to the Mesa. This image shows the Cow and Calf from the Mesa.

2/ Access to Adamsons Peak is from Adamsons Track, which diverges west from Rivulet Road west of Dover. The trip to Adamsons Peak takes seven hours, but you can also do a short diversion to see the old tramway. This was a steam tram route used by loggers in the early Twentieth Century. This image shows a trekker passing one of the giant logs left by the ancient loggers.

3/ This image shows the remnants of a bridge used by the ancient loggers. These logs have been lying down growing moss for nearly a century.

4/ We then returned to the main track and trekked west down Adamsons Track. We passed through a recovering forest. This image shows some of the more mature trees. They have a very ancient look about them. Unfortunately, the much larger trees were taken by the ancient loggers.

5/ This structure is the remains of a home built by the ancient loggers out of local rocks. It provided a good wind break and a good location marker.

6/ As we ascended Adamsons Peak, we were engulfed by cloud. It is a strange, scary, even mystical experience to be engulfed in cloud. This image shows the rugged country that we were passing through on our way to Adamsons Peak.

7/ This image shows the summit of Adamsons Peak. We would have to scramble over these boulders to reach the summit. The larger boulders are about the size of a person.

8/ This image shows two of our trekkers at the cairn on the summit of Adamsons Peak. This peak is 1225 metres high, but, unfortunately, there were no views, because of the dense cloud cover.

9/ Despite the freezing winds and the snow many creatures still live on Adamsons Peak This is a little gecko lizard. He was about the size of my hand.

10/ Our group now rested on the summit. The leader on the left is carrying the map. We would be following the spur line that you can see in the distance, which is covered by cloud.

11/ This image shows a second peak further north west of the summit of Adamsons Peak. The leader went over to it to get her bearings. She is in shorts, because trekking can make you quite warm. The golden rule is that you must always have cold weather clothing with you and you must never be far from your pack.

12/ We now trekked to the north west towards the Calf. This is the view back to Adamsons Peak, which we had just left. We were no longer following a defined track.

13/ This image shows the view to the north east of the spur line to the Calf. The edge of the Calf is on the left covered in cloud.

14/ This image shows our group ascending the Calf. They had dropped their packs at the base with other trekkers in order to ease their climb to the summit of the Calf. Cloud is obscuring the summit.

15/ This image shows the view on the west side of the Calf. After reaching the Calf we proceeded to the next objective of the Mesa.

16/ This image shows the spur line we were following to the Mesa. This is the horizon line that you can see running from the right to the left. A burst of sunlight has lighten up this side of the hill.

17/ This image is looking north from along the spur line to the Mesa. It shows you the kind of view you get from the high mountains, when they are not covered in cloud.

18/ This image shows the approach to the Mesa. Once again our view were obscured by cloud. These whiffs of clouds were passing over the spur line like a table cloth being pulled. It is an enchanting sight to watch clouds rolling over a mountain.

19/ Clouds come and go and towards sunset, I was able to get this great view to the west of the Mesa. The peaks and clouds gave this view a very mystical feeling. We camped over night in a sheltered area near the Mesa.

20/ This is a sunset view from the Mesa back to the Calf. You can see the spur line that we had followed on the right of this image.

21/ This image shows a morning view of the Mesa. We now began our return journey back to Dover. The trekker in the distance is carrying a 15 kilogram pack.

22/ The views that morning from the Mesa were simply awesome. This image show the view back to Dover.

23/ This was the view many hours later, as we exited Adamsons Peak. We were now following the Adamsons Track back to our bus on Rivulet Road.

24/ We also saw some exotic flowers. Like this lovely waratah flower with its strange shape.

25/ This was a strange shaped plant that I saw on the return journey.

1/ The Ida Bay Railway is a tourist railway, located at Ida Bay in the extreme south east of Tasmania. This photo shows the home station of the Ida Bay Railway.

2/ When they restored the station, they had to remove an enormous amount of regrowth. The Ida Bay Railway uses a very narrow gauge.

3/ This prime mover was originally a small truck on the old Ida Bay Railway.

4/ This shows the restored rail bus, once used to transport workers and materials to the coast, when the Ida Bay Railway was used by workers.

5/ This is a prime mover used to pull the tourist cars of the Ida Bay Railway.

6/ The machines are maintained in the old, restored railway shed of the Ida Bay Railway.

7/ The tiny train rattles a lot as it rumbles down the line. It was interesting the think that we were taking a tourist trip down what had once been a boring commute for the ancient mine workers.

8/ This image shows the view across Ida Bay, as we rumble to the west.

9/ The railway ended at Elliott Beach. This image looks across the calm waters of Jagers Bay.

10/ There was once a large mine near Elliot Beach. Today only the cemetery remains of what was once a busy place. The grave stones tell the stories of the ancient miners.

11/ We now walked down to Elliott Beach. We intended to walk as far east as the Southport Bluff.

12/ Elliott Beach is a beautiful, white sand beach. We have many such beaches in our Tasmania.

13/ Here one of our group enjoys the soft touch of the cool waters.

